Nail Painting Tips – Loose False Nails

Loose NailsAs I’ve recently started painting stiletto-shaped nails I came across an annoying problem – the only stiletto nails I could find were loose, meaning that they weren’t on a spine. Now, if I were painting the nails for myself this wouldn’t be a problem, I’d just have to glue them on and paint them on my nails. However as I was painting them for other people’s use, I needed a way of securing the nails so I could paint them without putting them on.

After scouring the internet, I found a pretty simple way of holding the nails – it may even be better than a spine, as you can secure each nail separately, making it easier to maneuver when you’re doing your nail art. So, if you need a way to secure loose nails because you’re painting them for someone else, if you want to paint them now but wear them later, or if you find it easier not having to worry about getting polish all over your nails, then just follow these instructions!

All you’ll need to do this are the four things in the picture above:

1. Scissors

2. Tape

3. Nails

4. some kind of stick to secure the nail to (here I’m using a cotton bud, but I’ve seen people using bamboo sticks, orange sticks, etc. You want something that is fairly sturdy and won’t just bend under the slightest pressure).

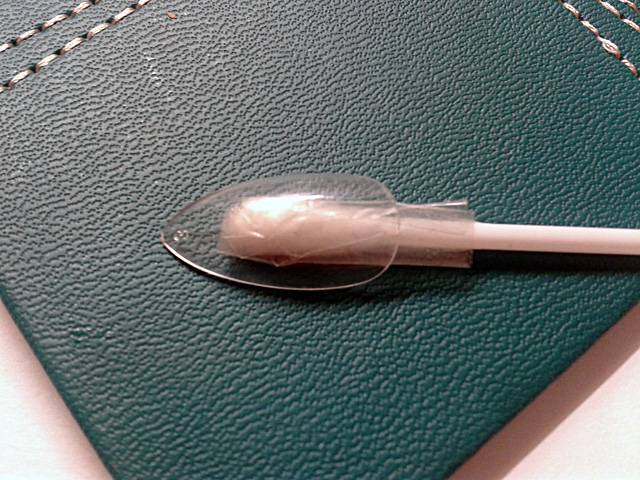
All you need to do then is cut a bit of tape, and wrap about half of it round the top of your stick . Then double back on yourself so that the sticky part of the tape is facing outwards. You essentially create a sort of loop with the sellotape so that it is both adhered to the stick, but so part of the sticky side is facing outwards. You might want to pat down the tape after this so that it closely adheres to the stick, you don’t want your nail to be wobbling about because the tape is loose.

Then you just press you nail onto the tape, et voila! You’re ready to go. Make sure you leave enough of the nail overhanging the stick to be able to remove it easily when it’s dry, but not so much that it isn’t secure. In the end, you should have something looking like this:

Loose NailHopefully this was helpful and easy enough to understand – if you have any questions, please feel free to ask!

TIP: If you don’t happen to have any tape laying around you can also use blu-tac/poster putty to adhere your nail to the stick. This makes it harder to take the nail off afterwards though and some of it can get stuck to the back of the nail.

The Easiest Nail Polish Remover… Ever?

I\’ve not had the best of luck with nail polish remover pots before, especially if my nail art has involved a lot of layers – but this one by Bourjois seems to look quite good. Anyone used it before? What did you think?

The Easiest Nail Polish Remover… Ever?.

via The Easiest Nail Polish Remover… Ever?.

Nail Care Tip #3

It’s time for another nail care tip! This time it’s about nail polish remover, the different types and which are the best to use. There are two main categories of nail polishes remover – acetone and acetone-free. Nail polishes with acetone are much better for getting tough varnish off, so if you’re doing intricate nail art of you’ve put some strong, long-lasting polish on then this is probably the one for you. However if you have sensitive skin or if your nails need a little more TLC, then the acetone-free remover is best. Both these types may come with additional features though; some contain ingredients designed to soothe the skin around the nails, some have extra stuff to help strengthen and repair your nails, and some have great scents for those who can’t stand the usual smell of nail polish remover – it’s all about looking at the choice on offer.

Nail varnish remover also comes in different forms. There’s the traditional liquid remover, which you apply using a cotton pad or something similar. You can get wipes which will give you less for your money, but may be more convenient and less messy – I also find they don’t tend to have such a strong smell. You can also gets tubs filled with foam where all you do is stick your finger in and twist it until the polish is off. I’m not too familiar with this particular type of remover, but it offers obvious advantages in terms of ease of use and storage.

I personally use Cutex Nourishing nail polish remover (shown above). It’s strong enough to remove my nail polish, although probably with a little more work than the Ultra Cleansing one. Because I use it often though, as I’m always changing my nails, I opted for the nourishing type just to give my nails that little bit of extra potential. It contains Vitamin E and a nail whitening formula. As far as I know Cutex make nail polish removers in the following types: Nourishing, Ultra Cleansing, Moisture Guard, Acetone Free, Regular, and Strengthening, and also make nail polish remover pads.

Nail Care Tip #2

In order to lighten the mood following my previous post, let us move on to nail care tip #2 – filing your nails.

If you want to keep your nails in tip-top shape, it follows that they’ll need filing at least every once in a while – but sometimes seeing the way some people file their nails makes me cringe! You should only file in one direction, towards the centre of the nail and up. DO NOT use a sawing, back-and-forth motion as this will tear and break your nails. Start off slow and try to keep to slow, long strokes to get a smoother finish. If possible, soak your hands before filing, although you must remember to dry your hands before the actual filing. Never file your nails when they’re wet as this will make them prone to breakage.

As for the files themselves, glass ones are the best, although a bit more expensive than the usual cardboard emery boards. Try to avoid metal ones as these aren’t great for your nails. You can get multi-sided files which have different levels of roughness, so you don’t have to use a really rough file just for a little bit of smoothing. You might also choose to buff your nails which will make them look extra smooth and shiny, but don’t do this too often as it can thin your nails.

Nail Care Tip #1

TIP #1 – ALWAYS USE A BASE COAT!

Nail polishes are full of various pigments and chemicals that can stain your nails if you don’t use a base coat, especially if you wear nail polish often. Using a base coat can also smooth the surface of your nails for easier application of nail polish, especially if you have an uneven nail surface, although if you have really deep ridges there are products called ‘ridge fillers’ designed to help with that problem. It takes two minutes and if you don’t have a basecoat, a top coat can often work just as well. There are different types that can help strengthen your nails or help them grow faster, which is an added bonus. On top of all this, using a base coat will make your polish stay on longer as it causes the polish to adhere to the nail better. Right at the moment I’m using Barry M’s Basecoat & Topcoat for £2.99, which is both a base coat and a top coat (it runs out easier but it’s one less bottle to store).