Delicate Pink Tutorial

I liked this design so much that I decided to wear it on my own nails and write a tutorial so you guys could try it at home 🙂 This one’s really easy, no special techniques or extra equipment required, just some polish and your mitts 😉

PinkWhat I Used:

Barry M Nail Paint – Strawberry Ice-Cream – £2.99

Barry M Nail Effects – Silver Foil, Lady, Duchess – £3.99 each

Barry M Silk – Pearl – £3.99

Barry M Basecoat & Topcoat – £2.99

Tutorial

Difficulty – 2/10

There’s nothing to this at all except layers, the only downside meaning you might have to wait around a bit for your nails to dry – but it’s worth it for this pretty design!
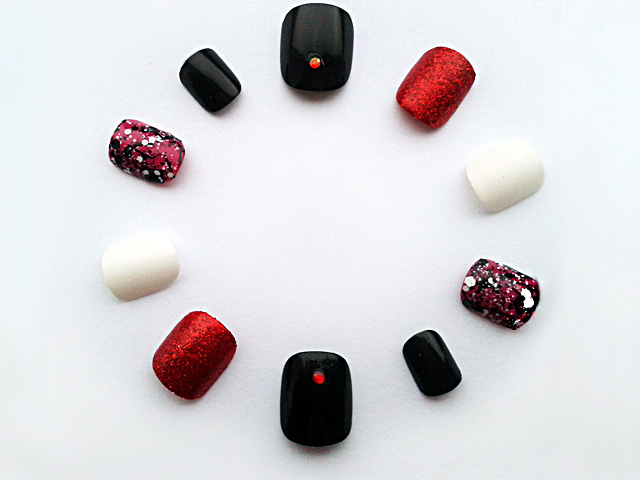
1. Apply basecoat.

2. Apply two layers of Strawberry Ice-Cream to your thumb, index finger and pinky.

3. Apply two layers of Pearl to your middle finger.

4. Apply two layers of Silver Foil to your ring finger.

5. Apply two layers of Duchess to your thumb (that’s the pink glitter).

6. Apply two layers of Lady to your middle finger (that’s a white glitter).

7. Apply top coat.

And that’s all there is to it!

If you’d like to buy my false nail set with this design, you can purchase it at my Etsy store here: https://www.etsy.com/uk/listing/181456993/pink-fake-nails-handpainted-false-nails

Mandarin Tutorial

Here I’ll show you how to recreate my newest nail set that I’ve dubbed ‘Mandarin’ 🙂 If you’d like to buy the set, you can find it at my Etsy store here: https://www.etsy.com/uk/listing/181188672/extra-short-orange-fake-nails-hand

MandarinWhat I Used:

Barry M Nail Paint – Bright Red – £2.99

Barry M Basecoat & Topcoat – £2.99

Essie Nail Polish – Orange, It’s Obvious – £7.99

Nail Star Nail Art Pen & Brush – Gold Glitter

Red and Gold Nail Gems

Dotting Tool

Nail Glue

Cosmetic Sponges

Tutorial

Difficulty 7/10

You’ll want to put something down on your table before doing this as you’re likely to make a bit of a mess. You’ll also need a little bit of a patience as it takes a lot of building up layers to achieve the gradient effect – but it’s so worth it in the end!

1. Apply base coat.

2. Apply a stripe of red and a stripe of orange next to each other on the end of a cosmetic sponge. Dab onto a piece of paper lightly to blend before dabbing onto the nails. You’ll need to do this several times in order to achieve an opaque gradient.

3. Apply top coat to smooth gradient.

4. Apply steaks of gold glitter starting at the base of the nail on every nail except the ring finger.

5. Using a dotting tool, orange stick, or something similar, and some nail glue, attach nail gems to the ring finger. Start with all red nail gems then slowly graduate to all gold at the top to recreate the gradient effect of the nail polish.

6. Apply a second top coat.

And you’re all done! 🙂

Nail Painting Tips – Loose False Nails

Loose NailsAs I’ve recently started painting stiletto-shaped nails I came across an annoying problem – the only stiletto nails I could find were loose, meaning that they weren’t on a spine. Now, if I were painting the nails for myself this wouldn’t be a problem, I’d just have to glue them on and paint them on my nails. However as I was painting them for other people’s use, I needed a way of securing the nails so I could paint them without putting them on.

After scouring the internet, I found a pretty simple way of holding the nails – it may even be better than a spine, as you can secure each nail separately, making it easier to maneuver when you’re doing your nail art. So, if you need a way to secure loose nails because you’re painting them for someone else, if you want to paint them now but wear them later, or if you find it easier not having to worry about getting polish all over your nails, then just follow these instructions!

All you’ll need to do this are the four things in the picture above:

1. Scissors

2. Tape

3. Nails

4. some kind of stick to secure the nail to (here I’m using a cotton bud, but I’ve seen people using bamboo sticks, orange sticks, etc. You want something that is fairly sturdy and won’t just bend under the slightest pressure).

All you need to do then is cut a bit of tape, and wrap about half of it round the top of your stick . Then double back on yourself so that the sticky part of the tape is facing outwards. You essentially create a sort of loop with the sellotape so that it is both adhered to the stick, but so part of the sticky side is facing outwards. You might want to pat down the tape after this so that it closely adheres to the stick, you don’t want your nail to be wobbling about because the tape is loose.

Then you just press you nail onto the tape, et voila! You’re ready to go. Make sure you leave enough of the nail overhanging the stick to be able to remove it easily when it’s dry, but not so much that it isn’t secure. In the end, you should have something looking like this:

Loose NailHopefully this was helpful and easy enough to understand – if you have any questions, please feel free to ask!

TIP: If you don’t happen to have any tape laying around you can also use blu-tac/poster putty to adhere your nail to the stick. This makes it harder to take the nail off afterwards though and some of it can get stuck to the back of the nail.

Valentine Tutorial

ValentineValentine

An extra-short set inspired by Valentine’s Day colour schemes 🙂

What I Used:

Barry M Nail Paint – Black, Matt White, Bright Red, Red Glitter, Fuchsia – £2.99 each

Barry M Basecoat & Topcoat – £2.99

Seventeen Off the Wall Graffiti Effect – Monochrome – £3.99

Bourjois So Matt Top Coat – £5.99

Red Nail Gems

Dotting Tool

Nail Glue

Tutorial

Difficulty – 3/10

You shouldn’t need much to make this design – just your polishes and gems and something to pick the gems up with (like an orange stick or dotting tool).

1. Apply base coat.

2. Apply two coats of Black to the thumb and pinky finger.

3. Apply a coat of Bright Red to the pointer finger.

4. Apply two coats of Matt White to the middle finger.

5. Apply two coats of Fuchsia to the ring finger.

6. Apply two coats of Red Glitter to the index finger.

7. Apply two coats of Monochrome to the ring finger.

8. Using a small amount of nail glue and an orange stick/dotting tool, apply a single red gem to the bottom-centre of the thumb nail.

9. Apply So Matt top coat to the middle nail.

10. Apply a normal top coat to the rest of the nails.

Simple! 🙂

*These nails are available to buy here: https://www.etsy.com/uk/listing/175058458/extra-short-fake-nails-hand-painted*

Americana Tutorial

PatriotAmericana Tutorial

This nail set was inspired by retro and vintage Americana memorabilia 🙂

What I Used:

Barry M Nail Paint – Black, Matte White, Bright Red, Indigo – £2.99 each

Barry M Basecoat & Topcoat – £2.99

17 Off the Wall Graffiti Effects – Monchrome – £3.99

Dotting Tool

Tutorial

Difficulty – 3/10

This design is super easy if you have a dotting tool, and still shouldn’t be too difficult even with a normal brush and a steady hand. This set is all about the colour scheme rather than different techniques.

1. Apply base coat.

2. Apply two coats of Bright Red to the thumb and pinky.

3. Apply two coats of Matte White to the index and middle fingers.

4. Apply two coats of Indigo to the ring finger.

5. Preferably using a dotting tool, apply small black dots to the index finger. The effect here will be best if you try and keep the dots quite small.

6. Apply two coats of Monochrome graffiti effect to the ring finger.

7. Apply top coat.

*This set is available to buy from my Etsy store: https://www.etsy.com/uk/listing/175069471/extra-short-fake-nails-hand-painted*

Irish Tutorial

IrishIrish Nails

This set is inspired by Spring and Irish colour schemes – it’s pretty simple and a nice way to brighten up these dreary Winter days!

What I Used:

Barry M Nail Paint – Spring Green, Lemon Ice-Cream, Matte White – £2.99 each

Barry M Basecoat & Topcoat – £2.99

17 Off The Wall Graffiti Nail Effects – Monochrome – £3.99

Nail Star Nail Art Pen & Brush – Orange – Bought in a set

Tutorial

Difficulty – 3/10

This isn’t a difficult design at all, the trickiest bit is the striping which can be made easier by using a nail art striping brush (but can certainly be done with a normal nail polish brush).

1. Apply base coat.

2. Apply two coats of Spring Green to the thumb and pinky nails.

3. Apply two coats of Lemon Ice-Cream to the index/pointer nail.

4. Apply two coats of Matte White to the middle and ring nails.

5. Apply two coats of Monochrome Graffiti Effect to the index nail.

6. Apply orange stripes to the ring nail. Try to keep them fairly thin and evenly spaced.

7. Apply a coat of Lemon Ice-Cream on the index nail, on top of the graffiti effect.

8. Apply top coat.

*This nail set is available to buy at my Etsy shop here: https://www.etsy.com/uk/listing/174928754/extra-short-fake-nails-hand-painted *

Snowflake Tutorial

Red SnowflakeSnowflake Nails

What I Used:

Barry M Nail Paint: Bright Red, Red Glitter – £2.99 each

Barry M Basecoat & Topcoat – £2.99

Barry M Nail Art Pen – White – £4.99

Tutorial

Difficulty: 5/10

This design will be really difficult if you don’t have a nail art pen or brush. It is possible but it’ll be a lot of work and pretty time consuming. If you don’t want to buy a nail art pen, then you can get a brush pretty cheaply and you can use it for any colour or design as long as you take care of it. You can probably also use normal paint brushes as long as they’re thin enough, but they won’t work quite as well with the nail polish.

1. Apply base coat.

2. Apply Bright Red.

3. Apply two coats of Red Glitter.

4. Using your nail art pen or brush, make the snowflakes. To do this all you have to do is:

– Draw a straight white line, don’t make it too long

– Draw another white line, the same length, intersecting the first line in the centre

– Draw another two white lines intersecting the centre, again, make sure they’re the same length

– Draw two smaller lines coming off of each line, near the end but not right at the end. You can vary the exact spacing to avoid making the lines cross over each other

5. Draw small white dots here and there in the remaining space.

6. Apply top coat.

*This design is available on false nail sets at my Etsy store – https://www.etsy.com/uk/shop/NailArtisan*

Red, Gold & White


Red, Gold and White

These nails are inspired by these nails from Nida Boutique – you can buy them for £6.17.

Red, Gold & White

What I Used:

Barry M Nail Paint – Bright Red, Matt White, Red Glitter – £2.99 each

Barry M Basecoat & Topcoat – £2.99

Barry M Textured Nail Effects – Majesty – £3.99

Barry M Nail Art Pen – Black – £4.99

Tutorial

Difficulty – 5/10

If you don’t have a nail art pen don’t worry, you can just use a normal black nail polish. To make it easier, use an orange stick or cocktail stick to apply the dots.

1. Apply base coat.

2. Apply two coats of Matte White to your thumb and ring finger.

3. Apply two coats of Bright Red to your middle and pinky finger.

4. Apply two coats of Majesty to your pointer finger.

5. Draw the heart using the Bright Red polish. Simply paint two thick lines coming towards each other at equal angles, to make a 90 degree angle at the point of the heart.

6. Use the same technique to draw a small heart on the pinky finger in Majesty (this one’s a bit more fiddly, make sure there’s not too much polish on your brush).

7. Apply small black dots on the ring finger in an alternating pattern.

8. Apply Red Glitter on top of the red hearts on your thumbs.

9. Apply top coat.

…p.s. I really need a new white polish, sorry it’s looking a little lumpy here!

Black & Gold Nails

Black and Gold

Black & Gold Nails

What I Used:

Barry M Nail Paint – Black, Gold Mine – £2.99 each

Barry M Nail Effects – Black Crackle, Gold Foil – £3.99 each

W7 Magnetic Magic Nail Polish – Gold – 99p

Technic Nail Varnish – Gold Glitter – 99p

Barry M Basecoat & Topcoat – £2.99

Gold and Black Nail Gems

Nail Glue and Dotting Tool

Cosmetic Sponge

Tutorial

Difficulty – 4/10

This is a design I did to go to a masquerade party in where my outfit was black and gold. There’s a lot of steps to this but there’s nothing particularly complicated. You’ll need something to apply the nail gems with (I used a dotting tool), but you can stick them on using either a clear coat or nail glue (I prefer nail glue as the gems will stay on for longer).

1. Apply base coat.

2. Apply two coats of Black to the thumb, middle and pinky nail.

3. Apply two coats of Gold Foil to the pointer finger.

4. Apply two coats of W7 Gold to the ring finger.

5. Apply two coats of Gold Mine to the thumb.

6. Apply one coat of Black Crackle to the pointer finger.

7. Using a cosmetic sponge, apply the gradient to the middle finger. Apply a stripe of Gold Foil and a stripe of Black next to each other on the sponge. Dab onto a piece of paper before dabbing onto the nail. Apply as many layers as needed.

8. Using a dotting tool or something similar, apply a line of nail gems in an alternating black/gold pattern near the top of your ring finger nail (imagine where the line would be on a French Manicure).

9. Apply two layers of Gold Glitter to the pinky finger.

10. Apply a line of Black to the tip of the pointer finger.

11. Apply some Gold Glitter to the tip of the middle finger along the gradient.

12. Apply a top coat to all nails.

As you can see, there are a lot of steps – but no one step is too complicated. Remember to get all your polishes out before starting so you won’t have to go rummaging through your bag to find any you forgot!

Union Jack Nails

Union Jack

Union Jack Nails

What I Used:

Barry M Nail Paint: Indigo, Bright Red, Matt White – £2.99 each

Barry M Basecoat & Topcoat – £2.99

Tutorial

Difficulty – 6/10

This one is a LOT easier if you have a long, striping brush. It is possible to do it with a normal polish brush but it will be a lot more fiddly. If you do use a striping brush, remember to wash it better different colours and afterwards to keep it in good condition.

1. Apply base coat.

2. Apply two coats of Indigo.

3. Apply a vertical line, a horizontal line, and two diagonal lines all crossing through the centre in Matt White.

4. Do the same with the Bright Red, but do the lines more thinly so that you leave a border of white around them.

5. Apply topcoat.

Not many steps and fairly simple in that respect – just remember to keep a steady hand. This one’s also a bit time-consuming, if you want a quicker design, just do the union jacks on your thumbs and ring fingers, and paint the rest of your nails in just one solid colour (I’d personally recommend painting them blue).

*Available to buy from http://www.etsy.com/uk/shop/NailArtisan?ref=si_shop*