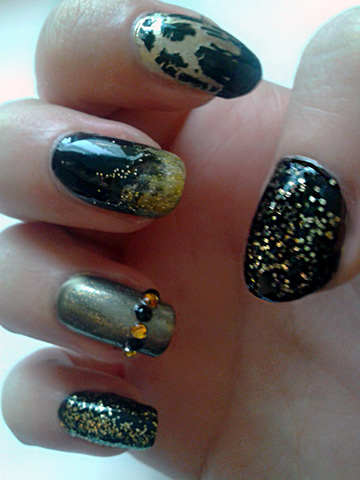
Ivory & Purple

My newest stiletto nail set, made using my new Barry M Silk Effect nail polish! I think they’re quite elegant, they might be nice for a formal occasion 🙂

Pearl

Available from my Etsy store: https://www.etsy.com/uk/listing/180525562/white-purple-stiletto-fake-nails-hand

Black & Gold Nails

Black and Gold

Black & Gold Nails

What I Used:

Barry M Nail Paint – Black, Gold Mine – £2.99 each

Barry M Nail Effects – Black Crackle, Gold Foil – £3.99 each

W7 Magnetic Magic Nail Polish – Gold – 99p

Technic Nail Varnish – Gold Glitter – 99p

Barry M Basecoat & Topcoat – £2.99

Gold and Black Nail Gems

Nail Glue and Dotting Tool

Cosmetic Sponge

Tutorial

Difficulty – 4/10

This is a design I did to go to a masquerade party in where my outfit was black and gold. There’s a lot of steps to this but there’s nothing particularly complicated. You’ll need something to apply the nail gems with (I used a dotting tool), but you can stick them on using either a clear coat or nail glue (I prefer nail glue as the gems will stay on for longer).

1. Apply base coat.

2. Apply two coats of Black to the thumb, middle and pinky nail.

3. Apply two coats of Gold Foil to the pointer finger.

4. Apply two coats of W7 Gold to the ring finger.

5. Apply two coats of Gold Mine to the thumb.

6. Apply one coat of Black Crackle to the pointer finger.

7. Using a cosmetic sponge, apply the gradient to the middle finger. Apply a stripe of Gold Foil and a stripe of Black next to each other on the sponge. Dab onto a piece of paper before dabbing onto the nail. Apply as many layers as needed.

8. Using a dotting tool or something similar, apply a line of nail gems in an alternating black/gold pattern near the top of your ring finger nail (imagine where the line would be on a French Manicure).

9. Apply two layers of Gold Glitter to the pinky finger.

10. Apply a line of Black to the tip of the pointer finger.

11. Apply some Gold Glitter to the tip of the middle finger along the gradient.

12. Apply a top coat to all nails.

As you can see, there are a lot of steps – but no one step is too complicated. Remember to get all your polishes out before starting so you won’t have to go rummaging through your bag to find any you forgot!

Velvet Leopard Nails

Velvet Leopard II

Velvet Leopard Nails

What I Used:

Barry M Nail Paint – Raspberry, Black – £2.99 each

Barry M Basecoat & Top Coat – £2.99

Barry M Nail Foil Effects – Gold – £3.99

Cairuo Nail Polish – Chocolate Brown – 99p

Clear/Silver Nail Gems

Dotting Tool

W7 Magnetic Magic Nail Polish – Gold – 99p (I think this is the shade anyway, I had to look online as it doesn’t say on the bottle. This seemed to be the only one to match – it’s a shame that I don’t seem to have a magnet to go with it!)

Tutorial

Difficulty – 6/10

There’s a lot of layers to this design but none of them are too difficult. A couple of parts are a bit fiddly and will be easier if you have a long striping brush, but are still perfectly doable without one.

1. Apply base coat.

2. Apply two coats of Gold Foil Effect.

3. Apply two layers of Raspberry to the bottom halves of the nails – vary the designs slightly by using diagonal lines, straight lines, or not adding the Raspberry portion to some of the nails at all.

4. Apply a stripe of Gold (W7) along the line where the Raspberry and Gold Foil Effect polishes meet. This is easier if you use a striping brush.

5. On the gold portions of the nails, apply uneven splodges of Chocolate Brown. Again, mix it up by leaving some parts blank.

6. Apply Black around the edges of the brown splodges to create a leopard effect. Feel free to find a leopard print pattern online to use as a guide.

7. Apply little black dots sparingly on the leopard print portions of the nails.

8. Apply top coat.

9. Quickly, before the clear coat can dry, use a dotting tool or other tool to apply a single clear nail gem to the centre of every horizontal line (I didn’t apply them to the diagonal lines, but there’s no reason you can’t if you’d prefer to).

10. Apply another top coat to nails with gems.

*This design is available to buy at: http://www.etsy.com/uk/shop/NailArtisan?ref=si_shop*

Pink Gem Mani

Pink Gem Mani


Pink Gem Mani

What I Used:

Barry M Nail Paint – Strawberry Ice-Cream, Matt White – £2.99 each

Barry M Basecoat & Topcoat – £2.99

Nail Glue

Dotting Tool

Light Pink Nail Gems

Tutorial

Difficulty: 5/10

If you’ve applied nail gems before, then this design will be a doddle – if not, you may find it a bit more time-consuming, but should still manage without too much difficulty.

1. Apply basecoat.

2. Apply one/two coats of Matt White.

3. Apply two coats of Strawberry Ice-Cream, leaving the tips white.

4. Apply a line of nail glue where the pink and white meet.

5. Get a little nail glue on the end of your dotting tool (or orange stick, etc.) and quickly apply the nail gems along the line before the glue dries. Be careful to keep the line straight and make sure the gems are packed tightly next to one another.

6. Apply top coat.

*Available to buy as extra short nails here: http://www.etsy.com/uk/shop/NailArtisan?ref=si_shop*

New Extra Short Nails

What do you think of my newest extra short nails? There’s been a lot of demand for short ones so I thought up some designs especially for them! The Green Pearl set also features my first tentative venture into 3D nail art – what do you guys think of 3D nail art, yay or nay?

P.S. Don’t forget about the nail art competition guys! Post your entry in the comments section on my blog or e-mail it to me at akaichou@hotmail.co.uk!

Green Pearl II

Green Pearl Nails – http://www.etsy.com/uk/listing/158201338/false-nail-set-extra-short-nails-extra?ref=shop_home_active

Mermaid II

Mermaid Nails – http://www.etsy.com/uk/listing/158201826/false-nail-set-extra-short-nails-extra?ref=shop_home_active

Pink and Silver Tutorial

My Pink & Silver


Pink & Silver Nails

What I Used:

Barry M Nail Paint – Strawberry Ice-Cream – £2.99

Barry M Nail Effects – Silver Foil – £3.99

Barry M Basecoat & Topcoat – £2.99

Technic Nail Polish – Silver Glitter – 99p

Silver/Clear Nail Gems (Rhinestones)

Gem Applicator/Dotting Tool

Tutorial

Difficulty – 3/10

This design is simple, cute, and really easy to do. All you need are your polishes, a few gems, and something to stick them on with (such as an orange stick or dotting tool).

1. Apply base coat.

2. Apply Silver Foil to all nails except the ring finger.

3. Apply two coats of Strawberry Ice-Cream to your ring fingernails.

4. Apply two coats of Silver Glitter to all nails except the ring finger.

5. Using a dotting tool, orange stick, or something similar, apply three nails gems to the corner of each ring fingernail. In order to do this you will either need to use a little bit of nail glue, or apply a layer of clear coat onto the nail before applying. Remember to put a little bit on your applicator as well so you can pick up the gems. (I personally prefer to use nail glue as it holds the gems on better).

6. Apply top coat to all nails.

And that’s all there is to it!

*Nail set available with this design at http://www.etsy.com/uk/shop/NailArtisan*

Party Nails

Kev Party

Party Nails

What I Used:

Barry M Nail Paint – Black – £2.99

Barry M Foil Effects – Gold – £3.99

Barry M Crackle Effects – Black – £3.99

Barry M Basecoat & Topcoat – £2.99

Black Nail Gems

Dotting Tool

Tutorial

Difficulty – 4/10

I did these nails for a party I’m going to tomorrow – I’m wearing a red tartan dress so it was hard thinking of colours that would go with it, but I settled for black and gold in the end. This design is mostly straight-forward, the only fiddly bit is applying the nail gems to the ring finger nail.

1. Apply base coat.

2. Apply two coats of Black to the thumb and middle finger nails.

3. Apply two coats of Gold Foil to the index, ring, and pinky finger nails.

4. Using a dotting tool, apply dots of gold onto the thumb and middle finger nails in the designs shown in the picture above.

5. Apply a coat of the Black Crackle to the pinky finger.

6. Apply Black to the tips of the index and pinky nails.

7. Using an orange stick, dotting tool, or other tool, apply black nail gems/rhinestones around the border of your ring finger nail. I used nail glue to do this, but you can also use a clear coat, although it won’t stick as well.

8. Apply top coat.

Blue & Silver (First Time Trying Nail Caviar)

Blue & Silver I


Blue & Silver Nails with Gems and Nail Caviar

What I Used:

Barry M Nail Paint Foil Effects – Silver – £3.99

Technic Nail Polish – South Pacific – 99p

Caviar Beads – Silver – Bought online in a set for £1

Nail Gems – Silver – Bought online in a set for £1

Nail Art Brush – Bought online in a set

Tutorial

Difficulty – 4/10

The first thing to take note of here is that nail caviar/ nail beads are very messy. You’ll want to put a sheet of paper down so that at the end you can take any beads that haven’t stuck to your nails and put them back into the jar/bottle for later use. In this instance I used the method of simple sprinkling the beads onto a coat of wet nail polish – however this was really messy and didn’t provide very good coverage on the nail. For next time I’ve had the idea of pouring the beads into a bowl, pressing the nail into them and then pouring the leftover beads back into the bottle. I’ll write a tutorial about this later if I find it works better.

1. Apply base coat.

2. Apply two coats of South Pacific to every nail except the middle finger.

3. Apply a clear coat to the ring finger and then pour the nail beads on. Try to cover as much of the nail as possible and remember to do this over a piece of paper so you can put leftover beads back into the bottle for later use. Leave to dry.

4. Apply two coats of Silver Foil Effects to the middle finger.

5. Using a brush, apply the swirling pattern onto the thumb nail in Silver (see above picture for reference).

6. Using an orange stick or other tool and nail glue, apply nail gems over the pattern wherever you think they look best (again you can use the picture above as a reference).

6. Making sure that all the nail are dry, apply a top coat.

*Available to buy at http://www.etsy.com/uk/NailArtisan*

Gatsby

Gatsby II


Gatsby

What I Used:

Barry M Nail Paint – Black – £2.99

Technic Nail Polish – Bronze – 99p

W7 Nail Polish – Metallic Saturn – £2.95

17 Supreme Shine Nail Polish – Sphinx – £2.99

Barry M Basecoat & Topcoat – £2.99

Nail Star Nail Art Brush & Pen – Gold Glitter – Bought online in a set

Gold Nail Gems – Bought in set on Ebay for £1

Nail Art Brushes

Nail Dotting Tool (to apply gems)

Tutorial

Difficulty – 7/10

This design was inspired by the movie/book ‘The Great Gatsby.’ For this you need some nail gems and a tool to apply them with (I used a dotting tool but you could use an orange stick or something else), as well as glue to make them stick (there’s not enough time to apply so many gems using only a wet top coat).

1. Apply base coat.

2. Apply two coats of Black to the first, third and fourth nails (obviously you’ll need to tweak with the arrangement of the nail colours if you’re doing this design on your own nails, unless you happen to have six fingers 😉 ).

3. Apply two coats of Metallic Saturn to the second and fifth nails.

4. Apply two coats of Bronze to the sixth nail.

4. Using a nail art brush with Sphinx, draw the line design onto the first nail.

5. Using an orange stick or other tool, apply the nail gems to the fourth gem. You’ll need nail glue to do this as there won’t be enough time to apply a full nail of gems using only a wet top coat.

6. Go over the line design with glittery gold.

7. Apply top coat.

*Available to buy from http://www.etsy.com/uk/shop/NailArtisan*