Blue Patchwork

Blue Patchwork I

Blue Patchwork

What I Used:

Barry M Nail Paint – Cyan Blue, Indigo, Spring Green – £2.99 each

Barry M Basecoat & Topcoat – £2.99

Barry M Nail Art Pen – Black – £4.99

Technic Nail Polish – South Pacific – 99p

Essie Matte About You Mattifying Top Coat – £7.99

Tutorial

Difficulty – 6/10

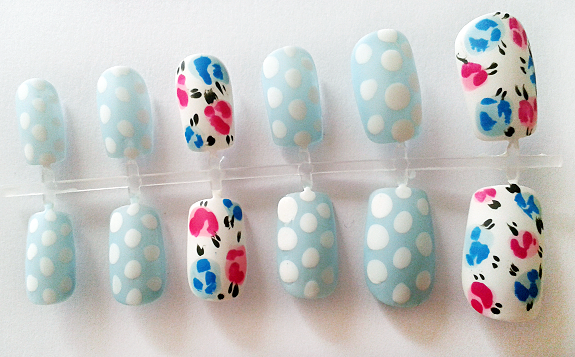
This one will be a bit tricky if you don’t have a nail art pen, although it is possible to do with a nail art brush or even with your usual nail polish brush. This is a very versatile design too, try experimenting with different colours and shapes! If you get stuck at any point just use the picture of my design above as a guide.

1. Apply base coat.

2. Apply two coats of your base colour – I used South Pacific.

3. Paint on various shapes with your other colours – I chose to use three but you can use as many as you want. I wouldn’t recommend using less than three colours altogether though. Try to keep the ratio of colours even so that you don’t have too much or too little of any particular colour – also remember to leave some of your base colour showing!

4. Draw lines between the shapes using either a black nail art pen or with black nail polish, applied with either the normal polish brush or a nail art brush. I would recommend using a nail art pen or brush as it’s easier to get more precise lines.

5. Apply stitch marks here and there on the lines to create that ‘sewn up’ effect.

6. Apply mattifying top coat.

*Available to buy at: http://www.etsy.com/uk/shop/NailArtisan?ref=si_shop*

Blue & Silver (First Time Trying Nail Caviar)

Blue & Silver I


Blue & Silver Nails with Gems and Nail Caviar

What I Used:

Barry M Nail Paint Foil Effects – Silver – £3.99

Technic Nail Polish – South Pacific – 99p

Caviar Beads – Silver – Bought online in a set for £1

Nail Gems – Silver – Bought online in a set for £1

Nail Art Brush – Bought online in a set

Tutorial

Difficulty – 4/10

The first thing to take note of here is that nail caviar/ nail beads are very messy. You’ll want to put a sheet of paper down so that at the end you can take any beads that haven’t stuck to your nails and put them back into the jar/bottle for later use. In this instance I used the method of simple sprinkling the beads onto a coat of wet nail polish – however this was really messy and didn’t provide very good coverage on the nail. For next time I’ve had the idea of pouring the beads into a bowl, pressing the nail into them and then pouring the leftover beads back into the bottle. I’ll write a tutorial about this later if I find it works better.

1. Apply base coat.

2. Apply two coats of South Pacific to every nail except the middle finger.

3. Apply a clear coat to the ring finger and then pour the nail beads on. Try to cover as much of the nail as possible and remember to do this over a piece of paper so you can put leftover beads back into the bottle for later use. Leave to dry.

4. Apply two coats of Silver Foil Effects to the middle finger.

5. Using a brush, apply the swirling pattern onto the thumb nail in Silver (see above picture for reference).

6. Using an orange stick or other tool and nail glue, apply nail gems over the pattern wherever you think they look best (again you can use the picture above as a reference).

6. Making sure that all the nail are dry, apply a top coat.

*Available to buy at http://www.etsy.com/uk/NailArtisan*

Dandelion Nails

Dandelion Thumb

Dandelions

What I Used:

Barry M Nail Paint – Blue Moon, Matt White & Black – £2.99 each

Barry M Basecoat – £2.99

Essie Matte About You Mattifying Top Coat – £8.99

Tutorial

Difficulty – 4/10

This one isn’t actually too difficult – you don’t even need a nail brush; I started off with one but ditched it later on. You need a steady hand but that’s about it!

1. Apply base coat.

2. Apply two/three coats of Blue Moon (it’s quite thin and might need that third coat to be opaque)

3. Using the edge of the brush, draw the dandelion stalk in Black. Make sure the brush doesn’t have too much polish on it, or else it will just splodge everywhere. I did stalks on my thumbs and ring fingers.

4. The same applies for the White – use the edge to make the dandelion faeries. Apply them in multiple directions. Add some floating about away from the stalk to create the idea of a gentle breeze blowing them away. I added some on my index and middle finger, following in the direction of the imagined wind.

5. You might want to re-apply the top of the stalk in case the white has overlapped it. You want a black base for the faeries , so that the stalk ultimately looks like a long Y. Look at the picture above for reference.

6. Apply mattifying top coat.

Just a quick and pretty Summer design! (And shamelessly ripped off from somewhere on the internet – if you google search it you can probably find the original).

Dandelion


New Country House Nails in Blue

Blue Country

I’m going to make a range of this nail design in different colours due to popular demand. Currently we have this colour; blue, and baby pink in stock, but look out for other colours soon.

We will also soon be stocking new ‘extra short’ nails. These will be made to reach just past the fingertips, for those who aren’t keen on the long nail look!

Visit my Etsy shop to find all the nail sets I have in stock – http://www.etsy.com/uk/shop/NailArtisan

Glitter French Manicure Nail Sets

Blue Mani


Pink Mani


After doing this design on my nails I decided I liked it enough to do some false nails with it. I might do some more of this design in different colours if people show interest – I think yellow and orange with gold glitter might look nice 🙂

*Available to buy at http://www.etsy.com/uk/shop/NailArtisan*

Blue Glitter Mani

Blue Glitter Mani


Blue Glitter Mani

What I Used:

Technic Nail Varnish – South Pacific – 99p

Barry M Nail Paint – Indigo – £2.99

Barry M Basecoat & Topcoat – £2.99

Nail Star Nail Art Pen & Brush – Silver – Bought online in set

Tutorial

Difficulty – 3/10

This one’s a cute design that’s pretty easy to do and you can easily change the colours around to mix it up a little. I was torn between a matte or gloss finish, but in the end I decided the matte might look a little strange with the glitter.

1. Apply base coat.

2. Apply two coats of South Pacific.

3. Apply two coats of Indigo to the tips of your nails.

4. Using a striping brush, or carefully using a normal glitter nail polish, apply a line of silver glitter between the two shades of the blue where they meet.

5. Apply top coat.

Simple!

Glittery Blue Nails

Blue Glitter

Glitter Nails

What I Used:

Technic Nail Varnish – South Pacific – 99p

Nail Star Translucent Silver Glitter Nail Art Pen & Brush – Bought online in a set

Barry M Topcoat & Basecoat – £2.99

Tutorial

Difficulty – 1/10

This is really easy and really pretty – you need to choose a glitter varnish that is translucent so that it doesn’t alter the base colour when you apply it.

1. Apply base coat.

2. Apply two coats of South Pacific.

3. Apply the glitter, don’t make any neat lines, just cover the tip and then streak it down. Try to make it denser as it approaches the tip of the nail.

4. Apply top coat.

*Available to buy at http://www.etsy.com/uk/listing/151012955/false-nail-set-european-short-nails?ref=shop_home_active*

Hawaiian Nails

Hawaiian Nails

Hawaiian Nails

What I Used:

Barry M Nail Paint – Indigo, Cyan Blue & Matt White – £2.99 each

Barry M Topcoat & Basecoat – £2.99

Difficulty – 8/10

This one’s a really difficult, and I wouldn’t advise it if you don’t have nail art pens or brushes. I myself used my new brushes – the cyan blue flowers took two layers, but I had to go over the white ones several times before they became completely opaque. I might try the design with some brighter colours some other time – I’d like to do it in orange with yellow and white flowers but I can’t find my orange! Maybe someone could give it a go and let me know how it goes? 🙂

*Available to buy at: http://www.etsy.com/uk/listing/150982502/false-nail-set-european-short-nails?ref=shop_home_feat*

Gingham Nails and Voting Reminder

First I’d like to remind people about voting for the competition submissions – lots of people have liked the page but no-one has voted! I’ve added a poll so it won’t take two seconds to cast a vote! Nagging over 😛

Gingham

Gingham Nails

What I Used:

Barry M Nail Paint – Matt White, Blue Moon, Cyan Blue, Indigo – £2.99 each

Barry M Topcoat and Basecoat – £2.99

Tutorial

Difficulty – 3/10

This one’s made easier by the fact that you don’t want to lines to be too neat, you want to keep that general look of a gingham fabric.

1. Apply base coat.

2. Apply two coats of Matt White.

3. Apply one thin coat of Blue Moon.

4. Carefully apply both horizontal and vertical stripes in Cyan Blue. Again, you don’t want to worry about the lines being too straight, although make sure the lines themselves are clean.

4. Where the lines cross over, apply squares of Indigo, try to completely cover the area where the lines cross each other.

5. Apply your top coat.

*Available to buy at: http://www.etsy.com/uk/listing/150971124/false-nail-set-european-short-nails?ref=shop_home_active*

Blue Striped Nails

Blue Striped

Blue Striped Nails

What I Used:

Barry M Nail Paint – Indigo, Cyan Blue, Blue Moon, Black – £2.99 each

Barry M Topcoat and Basecoat – £2.99

This particular design just popped into my head, it’s kind of hard to make out the dark blue lines at the ends there, but they are there, I promise! I just used the layering technique to make the lines, although I also used my new brushes to clean up some of the black lines to make them as smooth as possible (really happy with my new brushes!)

Available to buy at: http://www.etsy.com/uk/listing/150935815/false-nail-set-european-short-nails?ref=shop_home_active